Searing sous vide steak and other foods is a great way to add color, flavor, and texture. Searing food is an essential cooking technique that many home chefs neglect.
You can sear sous vide steak, as well as other foods like chicken breasts, pork chops, and more.
This article will teach you how to sear your food when cooking with sous vide.
Table of Contents
Why Searing is Important
Searing is important, not just when sous vide cooking, but in all forms of cooking.
However, due to the “slow and low” method that is sous vide, the searing process is even more critical. Sous vide cooks meats and other ingredients to perfection internally, but that final sear (or pre-sous vide sear, more about this a little later) is essential to bring the whole dish together.
The searing process adds color to the dish, but more importantly, it adds flavor. Searing meats caramelizes the natural sugars present in the meat and forms that delicious brown crust, that to me symbolizes what a well-cooked steak has.
This browning of the surface and edges of the meat is known as the Maillard Reaction. And it is this process that gives steaks much of their wonderful flavor.
Other meats benefit from searing too. Chicken gets that tasty, crispy skin. And the flavor of pork, lamb, and vegetables are all greatly enhanced by a quick sear.
Should I Sear Before or After Sous Vide?
The ole sear before or after sous vide debate. There are pros and cons to both methods and chefs around the world are committed to one camp or the other.
There is even an argument that says a light sear before and after is the best method.
Before we delve into the argument, let me set out my own thoughts. I am in the “after sous vide” camp. I prefer the more precise control I get over the amount of sear and also prefer that straight from the pan flavor.
The Argument for Searing Before Sous Vide
As I mentioned, this is quite a heated topic of discussion and much of the points made are purely subjective without any clear consensus. But here is a quick list of some purported benefits of searing before sous vide.
- Pre-Searing speeds up browning – Pre-searing can cut down the browning time, this only applies to those who like to sear both before and after. I find that the browning time without this step is minimal anyway, but where this does help is by preventing overcooking with meats such as thinner steaks.
- Pre-Searing adds flavor – Some people argue that pre-searing food allows more of the seared flavor to permeate throughout the dish as it cooks sous vide. Another argument is that pre-searing helps by locking in the flavor.
- Pre-Searing is safer – Pre-searing food kills the bacteria that lives on the outside of the meat. This is more important if you are cooking ingredients with longer cooking times. If you don’t fancy pre-searing but still want to ensure the safety of your food, a quick dip in boiling water before the food is bagged will do the same job.
The Argument for Searing After Sous Vide
- The sear is fresh – For me, one of the great pleasures of a perfectly-cooked steak is the freshness of the sear. Those lovely crispy edges and browned meat are best enjoyed straight from the pan or grill.
- More control – Similar to the method known as reverse searing, applying the sear after the meat is cooked allows you more control over the searing process and the doneness of the steak or other ingredients.
- More crust – The crust that searing gives the meat is lost if the ingredients are pre-seared. This is one of the reasons that I love applying the sear just before serving, I have found that much of the crust and its associated flavor is lost during the sous vide process.
This is an area surrounded by a debate that isn’t going to go away. My advice is to try both methods and find the one that gives you the taste results you prefer.
- Related article: Sous Vide vs. Reverse Searing
Searing Methods and Equipment
Let’s look at the common ways to sear and the equipment that can be used to sear food.
Pan Sear
At its most basic, the base pan sear will do the job nicely. No special equipment needed as the majority of us will have pans at home.
- Heat the pan until it is hot
- Add a little fat or oil, keeping the heat at medium to high
- Once the oil is very hot, place the meat on it
- Press down on the meat, so it touches the pan’s surface
- Sear for about 60 seconds on each side of the meat
Cast Iron Skillet
Searing meat in a cast iron skillet pan is very similar to the method used in a standard pan. Compared to a pan, I prefer using a cast iron skillet because it gives a nice, crispy sear for steaks.
Once again, heat is the key here.
- Heat the skillet until it’s very hot, usually around 5 minutes on high heat
- Once hot, add enough oil to coat the base of the pan
- The oil should be hot to the point that it is just about to start smoking before the meat is added
- Depending on how you like your steak, do a quick sear of a minute or slightly longer on each side
You always want to make sure your cast iron is seasoned well and isn’t sticky before you use it to cook. You can find our best oils to season cast iron here.
Stainless Steel Pan
Searing in a stainless steel pan is identical to the methods above. Heat the pan, add the oil, all at high heat.
The problem with stainless steel is that food tends to stick to it. Here are tips to help avoid the meat sticking to the pan.
- Make sure the food is dry before searing. Pat the meat down with paper towel to dry them.
- Clean the pan thoroughly before searing. It’s the impurities and tiny particles of food that make the food prone to sticking
- Make sure the oil is hot before adding food
Sous Vide Kitchen Torch
I have great success with using kitchen torches for searing steaks. There are a couple of things to watch out for, but done correctly, this is a fast and effective method of searing.
A searing torch gives me the most control to get the perfect sear and beautiful crust.
Here are the keys to a nice sear when using a sear torch:
- Make sure the flame is adjusted correctly – You are aiming for a short dark blue flame and a constant hiss rather than a sputtering sound. Yellow or light blue flames mean the flame isn’t hot enough and is also dirty; i.e. excess, unburned fuel is being exhausted, which will taint the food.
- Spread the heat – A kitchen torch has a very concentrated flame, so be careful not to stay on one spot too long when using it. Make sure you spread the heat evenly over the food.
- Point away – This should be obvious, but always light the torch with it pointing away from you and towards the food.
Searzall Torch Attachment
The Searzall Torch Attachment is a device that attaches to the top of a blow torch. The Searzall takes the concentrated flame and diffuses it over a mesh surface into a wider and less intense flame.
The Searzall also ensures that the potential of unburnt fuel adding nasty flavors to your meal is removed.
The trick with the Searzall is all down to the distance of the flame from the food, there is a definite sweet spot to aim for. The manufacturer’s recommendations are below:
- Bread – 4” away
- Vegetables – 2” – 3”
- Cheese – 1.5”
- Steak – 0.75”
You can read our full Searzall review here.
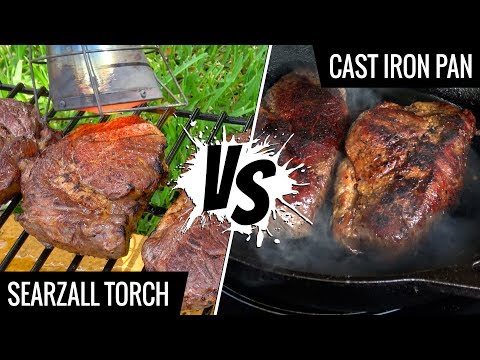
Here’s a video comparison of searing with a Cast Iron Pan vs Searzall:
Oven Searing
This isn’t a method I would recommend for steaks or other “quick cook” meats. However, if you are looking to sous vide larger and tougher cuts of meats, then oven searing is a great method. It is also one of the instances where I might hold my hand up and admit that pre-searing is the best option.
To oven sear, preheat the oven to between 450-500° F. Prepare and season the meat (it is best at room temperature and rubbed with a little oil). Place the meat in a roasting pan and place it in the hot oven for ten minutes.
After 10 min., turn it over and sear for 10 more minutes. It is now ready for sous vide.
Grilling
When I think of searing on the grill, I think of long summer evenings with the charcoal grill. This may not be the most controllable of searing methods, but for me, it’s always been the most fun.
Personally, I also find that sous vide cooking paired with grilling is the perfect combination. Most of the prep is already done, all that is needed is a quick sear. That leaves you more time to enjoy the evening and less time tied to a hot grill.
As ever the need for heat is paramount. Make sure the grill is as hot as possible before searing the food, particularly for steaks. Ideally, you should aim for a temperature of about 500° F (260° C). A gas grill will be easier for this unless you already have the charcoal going.
Once achieved it usually takes no more than a minute on each side for the perfect sear. You also get the nice grill marks to get that perfect crust.
Smoking
This may not be an obvious searing method, but if you have a smoker, then the combination of that smoky flavor and a rich caramelization can be unbeatable.
Of course, you need to aim for as high a heat as possible. Once the food is cooked to the required doneness, let it rest for a few minutes before placing it over the hottest part of your smoker. After a minute or so, turn it and sear on the opposite side.
There’s some debate on sous vide smoking, so you can read the article on whether it’s better to smoke before or after sous vide.
Best Method to Sear Steak
When I first tried torch searing, I was surprised by just how easy and effective the process was. The only question I had left was why I didn’t try it sooner.
Here are the steps required for the perfect kitchen torch sear.
- Prepare – Holding a lit kitchen torch when the steak isn’t ready yet is not a good idea. Make sure everything is ready before you light it. This includes having a heatproof tray or pan on hand and having the steak fully prepared
- Get the steak ready – The Steak should be cooked to within a few degrees of its required doneness and left to rest. You can also give it a quick ice bath to get a better sear and lessen the chance of the meat cooking further internally. Be sure to pat the meat dry with paper towels.
- Light the torch – Light the torch and make sure the oxidization of the flame is correct (dark blue and short flame, and a consistent hissing noise).
- Sear the Steak – Keeping the flame about two or three inches from the steak, move the flame slowly over the surface of the food. Make sure you don’t scorch any one area too long. Sear all sides of the steak for 40-60 seconds. You can also use tongs to hold the steak while searing the edges to make it easier.
Sous Vide Searing Tips
Tip 1 – Sous Vide Cook Slightly Under Desired Level of Doneness
The method I use when cooking steak is to sous vide the steak until it is slightly under the level of doneness I desire, then finalize with a quick sear that also brings the steak to the perfect doneness.
For example, the list below shows the temperatures you should aim for when cooking steak, I always set the temperature of my water a few degrees below this and finalize it with the sear process (another plus in post-sous vide sear camp in my opinion).
- Rare – 125° F (52° C)
- Medium Rare – 130° F (54° C)
- Medium – 140° F (60° C)
- Well Done – 160° F (71° C)
Tip 2 – Add Cold Oil to A Hot Pan
It is better to add cold oil to a hot pan (although once again, there are differing opinions). I like using high smoke point oils for searing like avocado oil or ghee.
Once the oil begins to “ripple” and spreads quickly over the surface, it is hot enough to cook on. It should only take a few minutes for this hot-and-fast sear.
The right heat means the food should sizzle without splattering. Doing it this way allows you to use less oil due to hot oil being less viscous.
Tip 3 – Sear in Small Batches
Sous vide allows for easy batch cooking, but that doesn’t mean you should batch sear.
Sear in small batches, because overcrowding the pan will quickly cause the oil to lose temperature. This will stop the caramelization and Maillard Reaction you are looking for when searing.
Searing FAQs
How long you sear steak after sous vide is dependent on several factors from personal preference to the method you are using. In general, searing a steak for around 40-60 seconds on each side when using a hot pan or cast iron skillet is enough for a delicious sear.
There are pros and cons to searing before and after sous vide. The decision is mostly a matter of preference. Searing after sous vide gives you more control over the doneness of the meat, and usually results in a crustier and more distinctly caramelized flavor. Searing before lets the flavor of the sear infuse into the steak and can also kill surface bacteria before cooking.
It is perfectly possible to cook the steak up to four days in advance if kept sealed in the sous vide bag. It will require reheating the steak before the sear process though, this can be done using the sous vide machine.
Salting steak before sous vide will cure the meat during the cooking process. Unless this is the result you are looking for, then salting is always best done after sous vide.